- Memory integrity relies on VBS and the hypervisor to protect the kernel against malicious code and untrusted drivers.
- Its activation depends on strict requirements of hardwarefirmware and drivers, which must comply with HVCI policies.
- The configuration can be managed via Registry, App Control, Intune, or GPO, and is verifiable with WMI, msinfo32, and SkTool.
- Common problems are solved by checking drivers, policies, and, in extreme cases, repairing or reinstalling Windows.
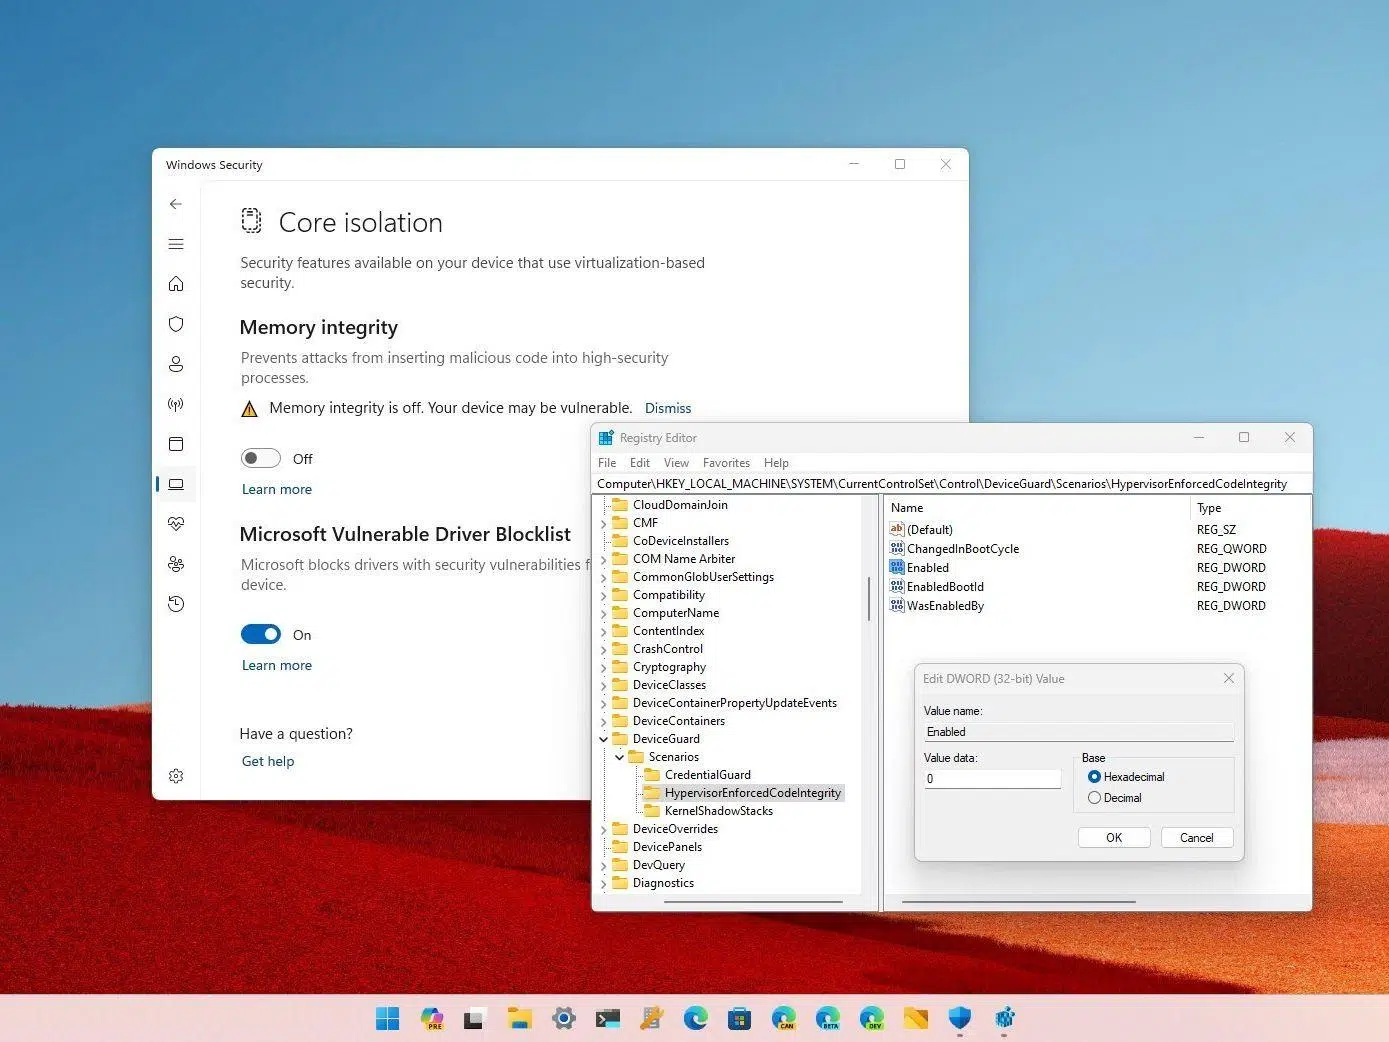
Memory Integrity has become one of those Windows security options that many users see on their screen, but very few actually know what it does, why it's so important, or how to configure it correctly. When the dreaded warning appears that it can't be enabled, things get complicated, and it's not uncommon to end up going around in circles with drivers, antivirus software, and restarts without really knowing what's going on.
In this article, we'll break down in detail how memory integrity works, what it has to do with virtualization-based security (VBS), how to enable or disable it from the graphical interface, the Registry, PowerShell , or policies, what hardware and software requirements it demands, how to check its actual status, and, of course, how to solve typical problems when it refuses to activate or is stuck with a yellow warning icon that won't disappear no matter what.
What exactly is memory integrity in Windows?
Memory integrity is a virtualization-based security (VBS) feature available in Windows 10, Windows 11 , and Windows Server 2016 and later. This feature leverages the Windows hypervisor to create an isolated runtime environment separate from the normal operating system, acting as a root of trust even if the Windows kernel is compromised.
Within this secure virtual environment , kernel-mode code integrity, also known as HVCI (Hypervisor-Enforced Code Integrity), is implemented. Thanks to this, memory pages used by the kernel are only marked as executable after passing integrity checks, and once executable, they can no longer be modified. This blocks many attacks that attempt to inject or manipulate code into the kernel.
In practice, memory integrity hardens Windows against advanced malware , rootkits, and exploits that attempt to load unsigned drivers, alter internal kernel structures, or modify critical memory allocations. It's a key component of the kernel isolation you see in the Windows Security app.
This protection also severely restricts kernel memory allocations that could be used to escalate privileges or take control of the system. Therefore, when it is enabled, it is relatively common for some older or poorly maintained drivers to fail to load if they do not meet the compatibility requirements.
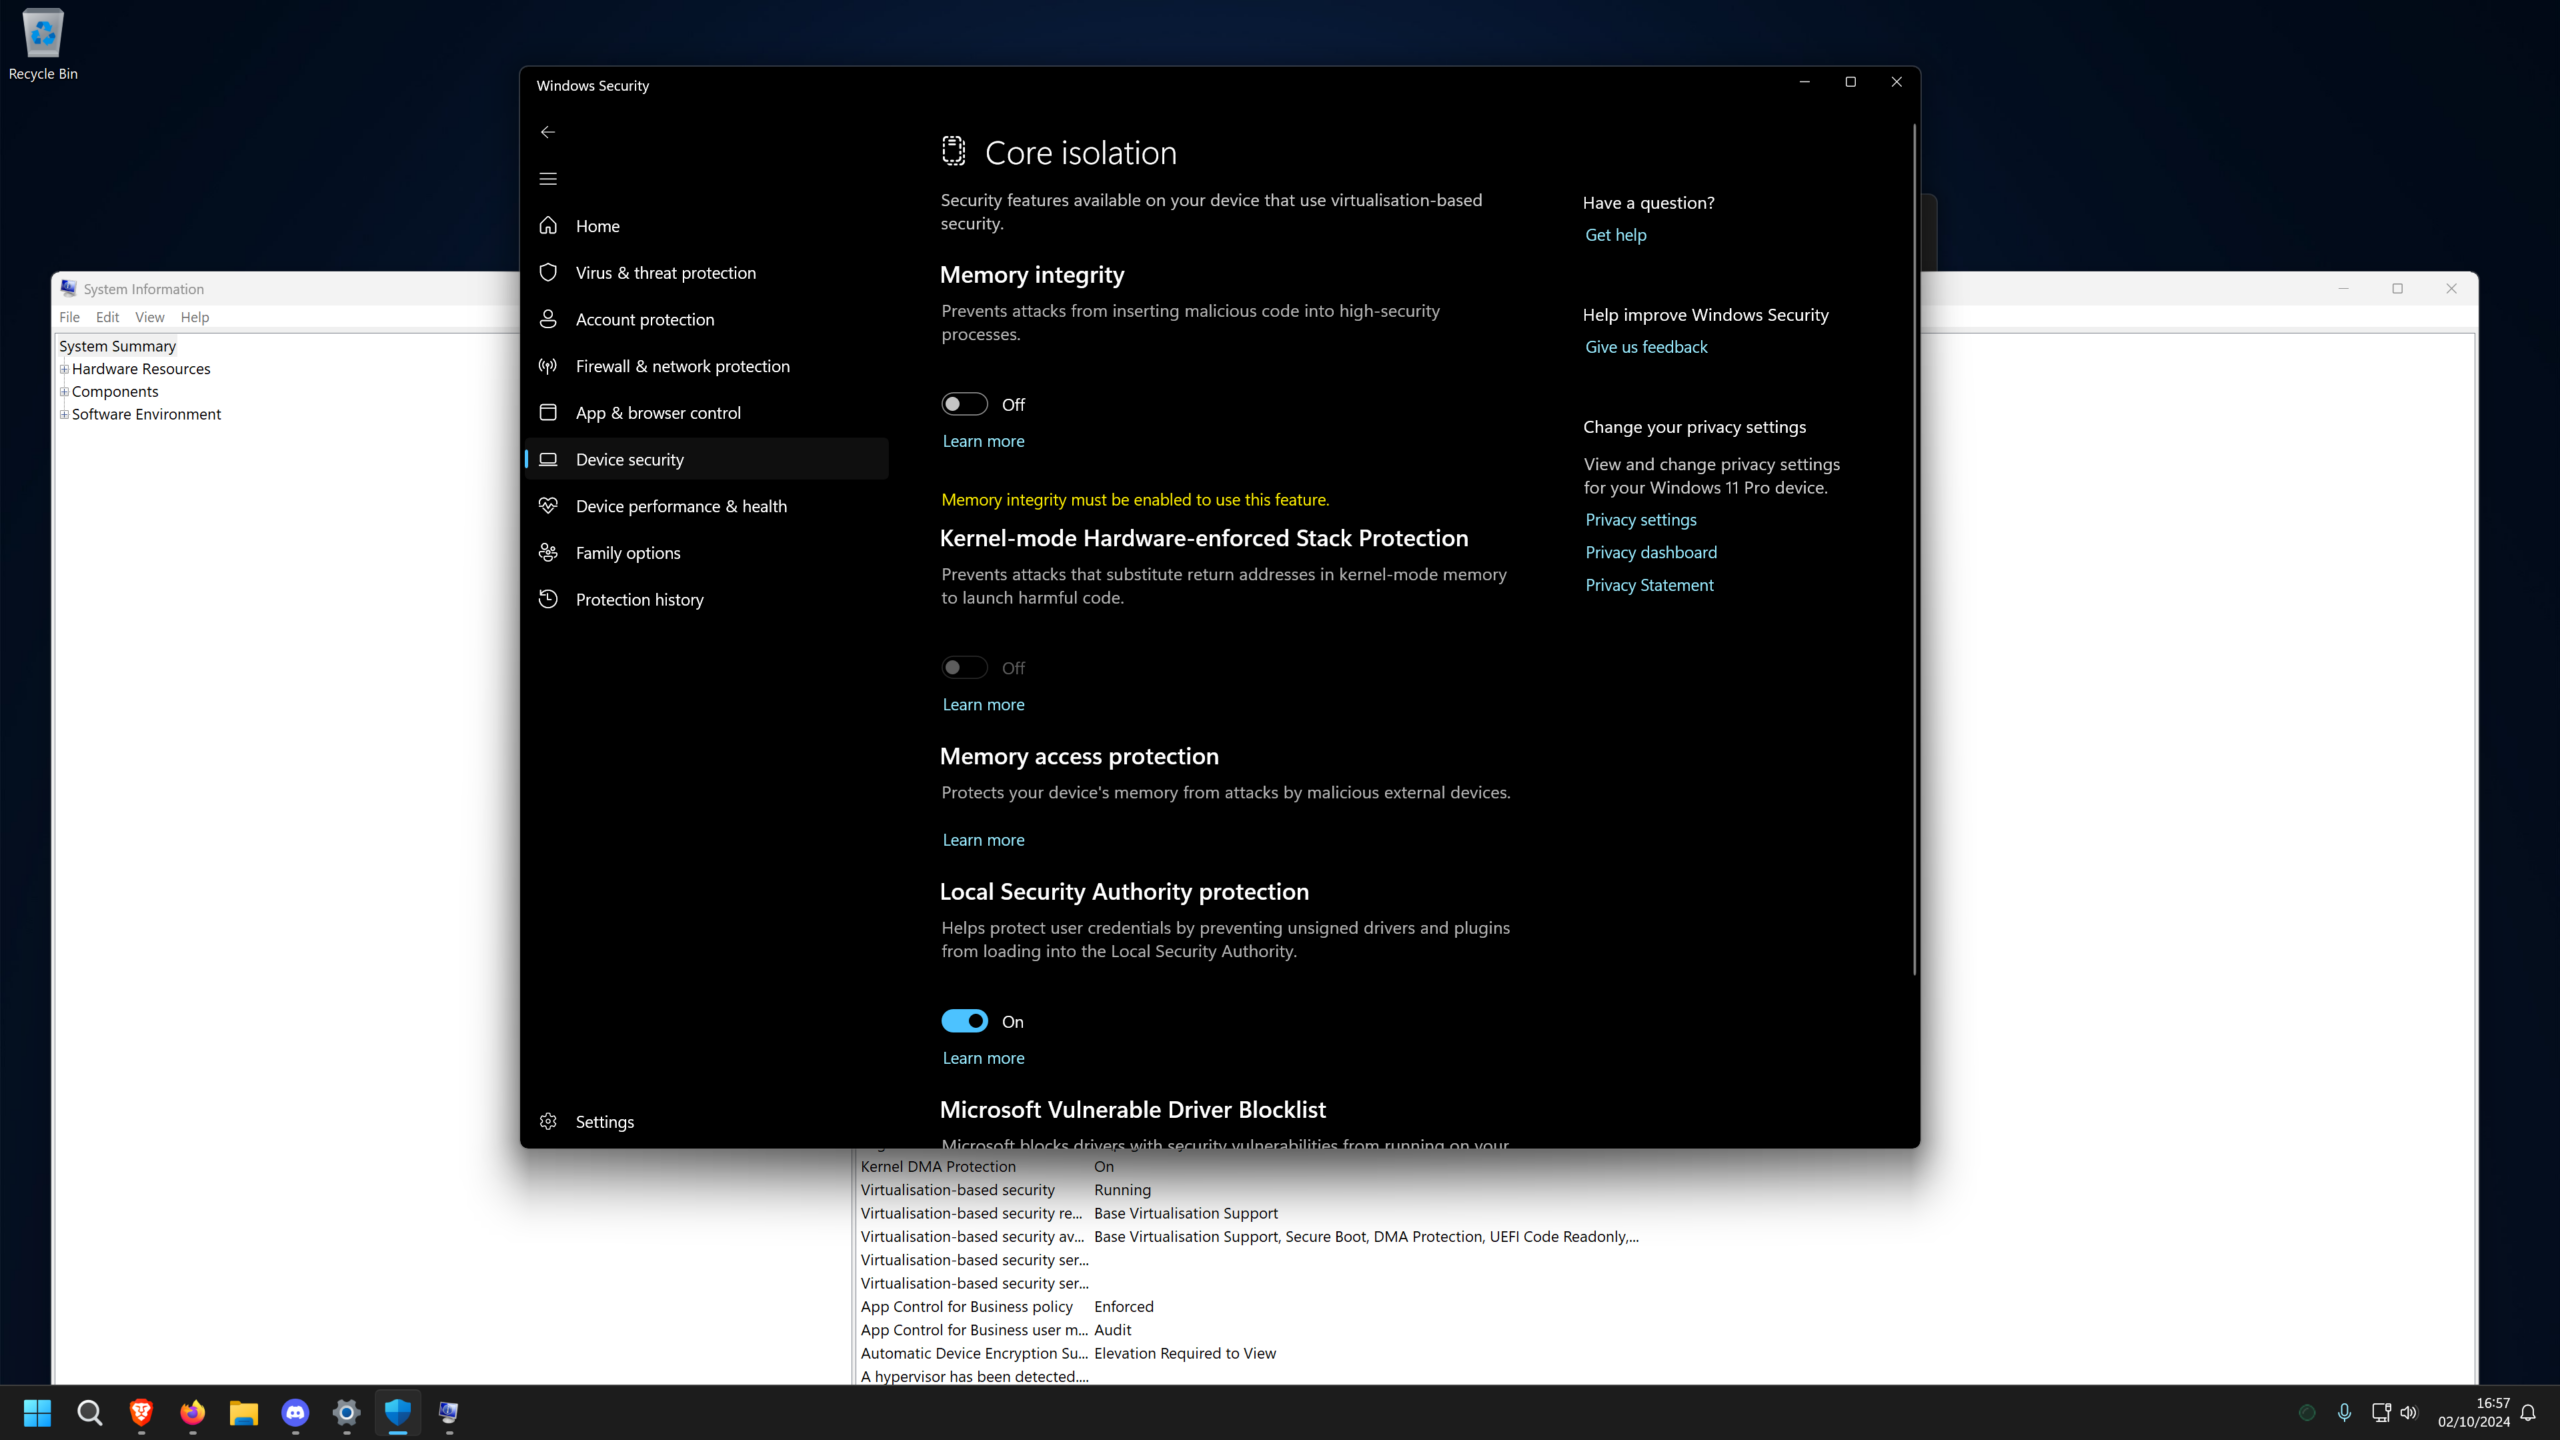
Security features that provide memory integrity
Memory integrity isn't just a pretty switch ; it enables very specific protections in kernel mode. Among the most important are those related to Control Flow Guard (CFG) and the code integrity process itself.
On one hand, the Control Flow Guard bitmap used by kernel-mode drivers is protected. CFG prevents the execution flow from jumping to illegitimate memory addresses; if an attacker attempts to redirect execution to malicious code, these protections block it.
On the other hand, the kernel-mode code integrity process is protected . This process is responsible for validating that loaded drivers and components have valid signatures and come from trusted sources. Memory integrity prevents other kernel processes from manipulating this logic or its configuration.
The result is that the entire system's chain of trust is strengthened : from secure boot and the hypervisor to driver validation, making it much harder for low-level malware to gain a foothold on the computer or survive reboots.
When it is activated by default and hardware requirements
In Windows 11, memory integrity is enabled by default in clean installations on compatible hardware, and also on factory-protected systems (for example, protected-core devices). In Windows 10, it was automatically enabled in clean S-mode installations, provided the system met the minimum requirements.
For automatic activation to be possible , the device must meet certain hardware and firmware requirements. If any of these fail, Windows will not activate VBS or HVCI by default, although you can always try to enable them manually later.
Typical requirements that Microsoft documents include a relatively modern processor ( 8th generation Intel or higher, AMD Zen 2 or later, Qualcomm Snapdragon 8180 or newer), at least 8 GB of RAM on x64 architectures (you can check the RAM ), an SSD of at least 64 GB, and, most importantly, memory integrity-compatible controllers.
Additionally, hardware virtualization must be enabled in the BIOS or UEFI , along with features such as Secure Boot, IOMMU, NX support, SMM mitigations, ACPI tables, and other technical requirements that Windows evaluates through internal checks. If any of these fail, memory integrity may not activate automatically.
Relationship between memory integrity and VBS
Memory integrity is one of the security scenarios that run on VBS. In fact, many configuration keys fall under DeviceGuard, which is the virtualization-based security umbrella in Windows.
VBS uses the Windows hypervisor to create a sort of "operating system within an operating system," where the secure kernel and certain critical functions, such as code integrity and Credential Guard, run. This isolated environment does not blindly trust the regular kernel, allowing it to assume that the kernel could be compromised without affecting the root of trust.
Memory Integrity (HVCI) is the component responsible for ensuring that kernel-mode code complies with integrity policies and prevents the loading of binaries or drivers that fail the filters. For it to function, VBS must be enabled and operational; without VBS, memory integrity cannot run.
From a configuration standpoint , you can enable only VBS, VBS along with memory integrity, or adjust features such as Mandatory, RequirePlatformSecurityFeatures, or UEFI Locking, which controls how much leeway the user has to disable these protections.
How to enable memory integrity from the Registry
For administrators or corporate environments , a common way to enable memory integrity is through registry keys and deployment scripts. Windows supports a recommended configuration that enables VBS and HVCI without blocking the UEFI firmware.
The recommended registry configuration involves setting several keys in HKLM\SYSTEM\CurrentControlSet\Control\DeviceGuard and in the Scenarios\HypervisorEnforcedCodeIntegrity subtree. This generally enforces virtualization-based security, specifies the required platform characteristics, and activates the hypervisor-protected code integrity scenario.
For example, reg add style commands can be used to: enable VBS (EnableVirtualizationBasedSecurity=1), require only Secure Boot or Secure Boot + DMA (RequirePlatformSecurityFeatures with a value of 1 or 3), control whether UEFI locking is active or not (Locked=0 or 1), and enable the HVCI scenario itself (Enabled=1 in the HypervisorEnforcedCodeIntegrity branch).
It's also possible to select the Mandatory option in DeviceGuard, which forces the system to stop booting if the hypervisor or any of its critical components fail to load. This is a stricter configuration, designed for environments where security is more important than availability, because the system will not continue booting if VBS fails.
Other advanced configuration options
If you want to change the default behavior , Microsoft documents several keys that allow you to enable only VBS without memory integrity, or to require different levels of boot protection (Secure Boot only, Secure Boot plus DMA protection, etc.). By adjusting these values, you can tailor the balance between security and compatibility with specific devices.
For example, if you only want VBS to be active but without HVCI, you can simply set EnableVirtualizationBasedSecurity=1 and leave the hypervisor code integrity scenario unconfigured, or explicitly disable it.
Another important option is UEFI locking , controlled by the Locked value. With Locked=1, a firmware-level lock is applied, making it more difficult for a local user to disable protections; with Locked=0, the door is left open to subsequent changes from the operating system.
Additionally, there is a special key called WasEnabledBy in the HypervisorEnforcedCodeIntegrity scenario that serves, among other things, to indicate whether the feature was enabled by the administrator and also to control the visibility of the memory integrity graphical interface in Windows Security.
Enable or disable the memory integrity interface
In some business environments, the goal is to prevent end users from tampering with memory integrity settings, or at least to ensure it's clear that these settings are managed by the administrator. This can be achieved by manipulating the WasEnabledBy key.
If the WasEnabledBy value is removed under HKLM\SYSTEM\CurrentControlSet\Control\DeviceGuard\Scenarios\HypervisorEnforcedCodeIntegrity, the Windows Security interface will display the typical message "This setting is managed by your administrator" and the switch will appear dimmed, preventing changes from the GUI.
If at any point it becomes necessary to return control to the normal interface, simply recreate WasEnabledBy as a REG_DWORD value and assign it the appropriate value (for example, 2), so that the user will again see the switch enabled to activate or deactivate memory integrity—provided there are no policies preventing it.
It is important to note that these registry manipulations must be done with administrator privileges and, in a corporate setting, preferably through controlled scripts, Intune, GPO, or similar tools, to avoid inconsistencies between computers.
Enable memory integrity with App Control for enterprise
In professional deployments, it is very common to use Windows Defender Application Control (App Control for businesses) to govern how code runs on computers, including enabling memory integrity.
There are several ways to do this : using the App Control policy creation or editing wizard, by selecting the Hypervisor Protected Code Integrity option in the rules section; using the PowerShell cmdlet Set-HVCIOptions, which allows you to set HVCI options in a scriptable way; or by directly editing the policy XML and adjusting the value of the <HVCIOptions> element.
This approach has the advantage that all configuration is centralized in the application control policy, making it possible to audit who runs what, apply allow and block lists, and ensure that HVCI remains active even if the user tries to modify it from the Windows interface.
Furthermore, integrating it with App Control provides an extra layer of defense: not only is the integrity of the drivers and kernel controlled, but also which user-mode binaries are allowed to run, greatly reducing the system's attack surface.
How to check if VBS and memory integrity are active
Once everything is configured, it's time to verify that VBS and memory integrity are actually enabled and running. Windows provides several tools for this, including console, graphical, and even WMI applications.
The first option is to use the Win32_DeviceGuard WMI class from an elevated PowerShell session. Running the command Get-CimInstance -ClassName Win32_DeviceGuard -Namespace root\Microsoft\Windows\DeviceGuard will yield an object with numerous properties related to VBS, memory integrity, and other security services.
Among the most interesting properties is AvailableSecurityProperties, which indicates what hardware-based security capabilities are available (hypervisor, Secure Boot, DMA protection, SMM mitigations, MBEC/GMET, APIC virtualization, etc.) by means of a series of numerical values that are listed as present or absent indicators.
Also noteworthy are CodeIntegrityPolicyEnforcementStatus and UsermodeCodeIntegrityPolicyEnforcementStatus, which indicate whether code integrity is disabled, in audit mode, or enforced for both kernel and user modes. This allows you to determine whether the policy is simply logging violations or actively blocking unauthorized code.
Other key properties are RequiredSecurityProperties (what is needed for VBS to function), SecurityServicesConfigured and SecurityServicesRunning (whether services such as Credential Guard or memory integrity are configured and running), VirtualizationBasedSecurityStatus (whether VBS is enabled and active), and VirtualMachineIsolationProperties, which details virtual machine isolation features such as AMD SEV-SNP or Intel TDX.
Check memory integrity using msinfo32 and the Registry
If you prefer a more visual approach , you can open msinfo32.exe from a command prompt or PowerShell with elevated privileges. In the system summary, towards the bottom, there's a section titled Virtualization-Based Security that details which VBS features are available and enabled.
There you can see, for example , if memory integrity is running, if it's only configured, or if VBS isn't even enabled. It's a quick way to perform a check without having to remember specific commands.
At the Registry level, there is also a volatile key that reflects the memory integrity state: HKLM\System\CurrentControlSet\Control\CI\State with the value HVCIEnabled. Checking this value allows you to determine whether HVCI is considered active at the current boot.
Additionally, administrators can review the setupact.log file and search for the string HVCI to see the messages the system leaves during the default enablement process. Entries such as “HVCI: Enabling HVCI” will appear when everything went well, or “OS does not meet HVCI auto-enablement requirements” when the system does not meet the criteria.
In case of compatibility issues , setupact.log can also display VBS_COMPAT_ISSUES codes with hexadecimal values that, bit by bit, indicate which specific requirement fails: unsupported architecture, lack of SLAT, absence of Secure Boot, absence of IOMMU, no MBEC, no UEFI, no WSMT table, no SSD, insufficient RAM, etc.
Troubleshooting common problems when enabling memory integrity
One of the most frequent problems is that, after enabling memory integrity, some device drivers stop loading or cause blue screens or crashes during startup. This usually happens with older, poorly maintained drivers or drivers that are not fully compatible with HVCI.
In these cases, a first step is to update the affected driver from Device Manager , looking for newer versions from the manufacturer that declare compatibility with memory integrity. Often, a driver update resolves the incompatibility without needing to disable the protection.
If the problem is more serious and the system enters a critical startup error or becomes unstable, you can resort to the Windows Recovery Environment (Windows RE). From there, after disabling the policies that enforced VBS and HVCI (for example, GPOs or scripts), you can load the Registry offline and set the value Enabled=0 in the HypervisorEnforcedCodeIntegrity key, so that memory integrity is disabled on the next boot.
After restarting , the computer should boot without HVCI restrictions, allowing for a more thorough investigation into which driver or component was causing the conflict. From there, you need to decide whether to replace the driver, upgrade the hardware, or keep memory integrity disabled, accepting the risk.
Using SkTool to diagnose VBS and hypervisor
For more advanced diagnostics , the Windows SDK includes a tool called SkTool that is used to inspect the hypervisor status, the secure kernel, and the mitigations associated with VBS.
SkTool is typically located in the Windows SDK bin folder, in a path similar to C:\Program Files (x86)\Windows Kits\10\bin\version\architecture. Running it without parameters displays status information about VBS and the hypervisor, including reasons why it may not have started.
Among the command-line modifiers are /status, which is the default behavior and summarizes the status of the hypervisor and the secure kernel; /lkey, which shows details of the provisioning of the VSM master key (useful for problems with ESS or Windows Hello); and /mitigations, which lists the mitigations active in both NT and the secure kernel.
For example, when the master key cannot be unlocked due to changes in the system's security status (such as disabling Secure Boot), SkTool explicitly indicates this, showing that it has generated a new VSM key and stored it in a UEFI variable, which helps to interpret why certain security features have stopped working.
Memory integrity in Hyper-V virtual machines
Memory integrity is not limited to physical hardware; it can also protect virtual machines running on Hyper-V, providing within the VM a level of security similar to that of a compatible physical device.
The basic requirements in this scenario are that the Hyper-V host runs at least Windows Server 2016 or Windows 10 version 1607, and that the virtual machine is generation 2, with a modern guest operating system (Windows 10 or Server 2016 and later).
From within the virtual machine , the procedure for enabling memory integrity is the same as on a physical machine: configure VBS, enable HVCI, and check driver compatibility. However, it's important to remember that this protection hardens the VM against internal malware, but it doesn't add any additional security against the host administrator.
The host retains the ability to disable VM memory integrity, for example with Set‑VMSecurity -VirtualizationBasedSecurityOptOut $true, so that in a controlled infrastructure, specific exceptions can be made for virtual machines that require features not supported by HVCI.
It's important to note that certain Hyper-V components don't support memory integrity within the VM, such as virtual Fibre Channel adapters or some scenarios involving pass-through disks and the AllowFullSCSICommandSet option. In these cases, you must exclude the virtual machine from VBS before connecting these components.
Why does the message “Cannot activate memory integrity” appear?
Many users encounter the error that memory integrity cannot be enabled from Windows Security, sometimes accompanied by a yellow warning icon and additional messages that certain drivers are not supported.
The causes are usually varied : from outdated or poorly signed drivers, to interference from third-party antivirus solutions that inject components into the kernel, compatibility problems with specific hardware, or even pending Windows updates that add support for VBS on that computer.
In some cases, an antivirus or security suite can become entangled in low-level processes, causing conflicts with memory integrity checks. Temporarily uninstalling the product or disabling certain real-time protection modules may be necessary to see if the conflict resolves.
Another recurring source of problems is outdated drivers for USB devices, special adapters, capture cards, highly specialized hardware, or virtualization software that installs its own drivers. Until these drivers are updated to HVCI-compatible versions, Windows will block their loading when memory integrity is enabled.
General methods for resolving memory integrity errors
There are several progressive strategies for addressing the "Memory integrity cannot be activated" message, ranging from the least invasive to the most drastic. It's not necessary to apply them all at once; the key is to eliminate possible causes one by one.
A reasonable first step is to check and update all drivers, especially those flagged as problematic by Windows in its memory integrity interface. Device Manager and the manufacturer's tools are your allies here.
It's also recommended to run a full malware scan using Windows Security or a trusted solution, in case any malicious code is interfering with the system. Take this opportunity to install all pending Windows updates, which often include VBS compatibility fixes.
If none of this works , you can use tools like the System File Checker (sfc /scannow) to repair damaged files, or start Windows in Safe Mode to see if it boots without conflicts and allows you to activate the feature from an environment with fewer third-party services loaded.
In extreme scenarios , where the system has accumulated many problems, it is not uncommon for the solution to involve a Windows reset while keeping files or even a clean installation from scratch, which usually resolves deep conflicts in the registry, drivers, or remnants of old software that refuse to disappear.
Concrete solutions: from SFC to clean reinstallation
Using the System File Checker (SFC) tool involves opening a command prompt as administrator, running `sfc /scannow`, and waiting for it to scan and repair corrupted system files. After the process, it's a good idea to restart your computer and try enabling Memory Integrity again from Windows Security > Device Security > Kernel Isolation.
Another less traumatic option than formatting is to reset your PC from within Windows settings. Select the option to reset the system and, if you wish, keep your files. This reinstalls the operating system, clears many problematic settings, and usually removes conflicting drivers and applications.
A clean install is the last resort: booting from an installation USB drive, deleting the partitions containing the previous Windows installation, and reinstalling everything from scratch. This involves reinstalling applications and restoring backups, but it leaves you with a much cleaner system in terms of memory integrity and VBS.
In all these processes, it's important to remember the potential impact on your data. While restoring while keeping files minimizes the risk, a clean install erases applications and documents from the system drive, so a reliable backup or data recovery strategy is almost mandatory if you want to avoid unpleasant surprises.
The role of data recovery tools
Memory integrity problems are often accompanied by symptoms of system instability, crashes, boot errors, or even the need to reset or reinstall Windows. All of this increases the likelihood of data loss, missing files, or partially corrupted volumes.
In this context, specialized data recovery utilities can make the difference between losing sensitive information and being able to restore it after a system crash or factory reset. This type of software can scan local disks, external drives, or USB flash drives to locate documents, photos, videos, and other files that no longer appear in File Explorer.
Many of these tools support typical scenarios related to Windows errors: reinstalls, deleted partitions, accidental deletions, malware attacks, unexpected shutdowns, etc. This makes them an additional layer of security when making significant changes to the system configuration, such as those sometimes required for memory activation or integrity repair.
Even so, nothing replaces having a good, regular backup plan, ideally with a local copy and a remote or cloud copy, so that any security incident or hardware failure doesn't leave you stranded with your computer locked and no easy way to recover years of work.
How to deal with the yellow memory integrity warning in companies
In environments managed via Intune or GPO, it is relatively common for memory integrity to be disabled by the organization's decision, but the yellow warning icon in kernel isolation still appears in the Windows Security app, which raises doubts among users.
The problem is that this warning doesn't always directly correspond to a simple registry value that's easy to manipulate, but rather to a combination of the actual HVCI status, active policies, and the WasEnabledBy value, among other factors. Therefore, simply disabling the feature by registry entry or policy doesn't always make the icon disappear.
One approach involves downplaying the memory integrity interface, forcing it to display the "Configured by administrator" message and disabling the switch. This is typically achieved by manipulating WasEnabledBy and applying the corresponding policies from Intune or Group Policy Objects (GPOs) to ensure the desired configuration is applied across all computers.
In any case, centralized management of these warnings requires careful testing, because a poorly designed configuration can lead to inconsistent behavior across machines or allow some users to change settings they shouldn't. The wisest approach is to validate the combination of policies, DeviceGuard values, and HypervisorEnforcedCodeIntegrity settings in pilot groups before mass deployment.
Understanding how memory integrity works , its dependence on VBS and the hypervisor, hardware requirements, driver compatibility, the registry keys involved, and the available diagnostic tools is essential to getting the most out of it without going crazy with activation errors, yellow icons, and blue screens. With good planning, monitoring drivers and policies, and combining it with backups and, if necessary, data recovery tools, you can enjoy a much more resilient Windows against advanced attacks without having to sacrifice stability or productivity.


Passionate writer about the world of bytes and technology in general. I love sharing my knowledge through writing, and that's what I'll do on this blog, show you all the most interesting things about gadgets, software, hardware, tech trends, and more. My goal is to help you navigate the digital world in a simple and entertaining way.