- Word allows you to automate date and time to keep documents always up to date.
- Choose between fixed or automatic data depending on the use of the document.
- Customize the date/time format and location to suit your language and region.
Have you asked yourself How can you make the date and time in your Word documents update automatically without having to type them manually every time? Whether you work with reports, minutes, certificates, or any other type of frequently used document, automating the updating of the date and time can save you time and prevent errors. Plus, you'll achieve a much more professional and organized look for all your files.
Many users are unaware of all the possibilities that Word offers for manage dynamic dates and timesIn this article, you'll learn step-by-step how to insert a date and time that updates automatically every time you open your document, how to customize its formatting, and the key differences between a fixed and dynamic date field. We'll also explore Tricks advanced and how to adapt these functions according to the version of Word you use.
Why automate date and time in Word?
In professional and academic environments, keeping your documents up to date with the correct date and time Not only does it give an organized image, but it may also be mandatory for legal or control reasons. Word allows you to insert temporary data either fixed or dynamically., avoiding having to modify them manually every time you issue a new report or version of a file. You will save time, you will prevent forgetfulness and your documents will always reflect the most recent time of editing or opening.
Key Differences: Fixed Date vs. Auto Date
Before we get into the nitty-gritty, it's important to understand that Word offers two main ways to insert dates and times:
- Date and time as static text: The data is inserted as it appears; it will not change even if you open the file later.
- Automatic date and time: They are inserted by means of a special field which updates the data every time the document is opened, printed or updated.
The use of one or the other will depend on your specific needs. If you are looking for the date never change (for example, to record the signature on a contract), you should use fixed text. If you need it to always be updated, opt for the automatic method.
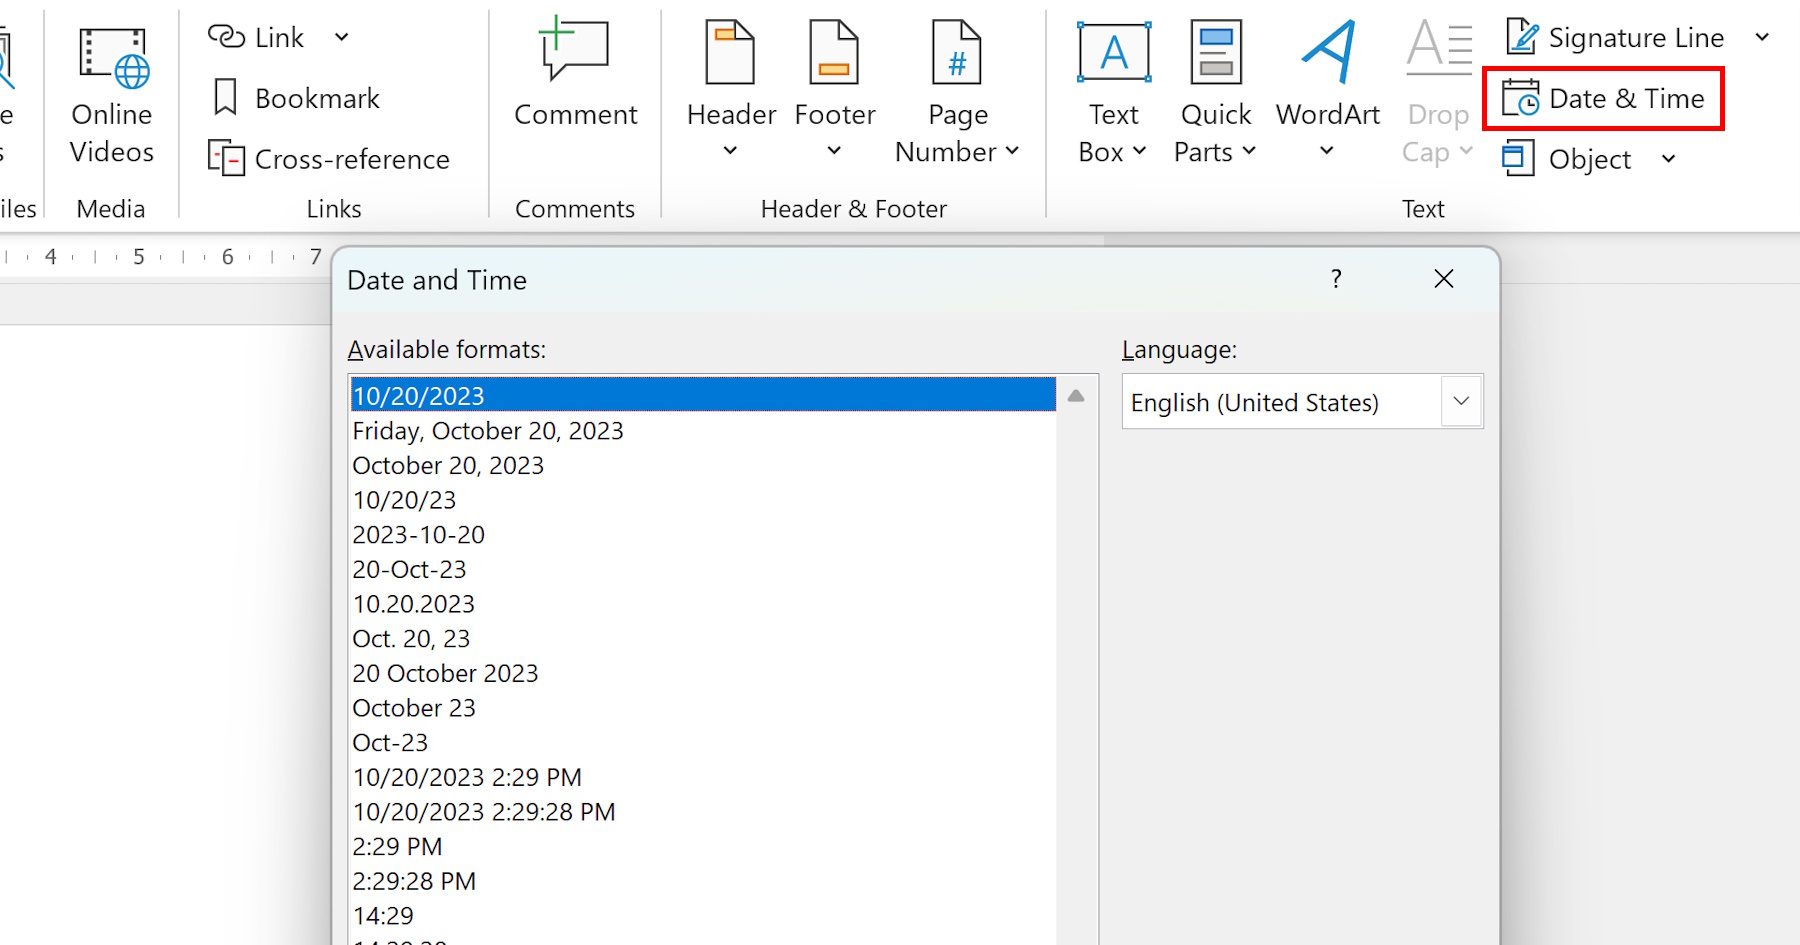
How to insert the date and time in Word step by step
Let's see, in detail, how to perform this process in any Word document. These steps are valid for most modern versions:
- Place the cursor in the desired location of your document where you want the date or time to appear.
- Go to the tab Insert from the top bar of Word.
- Find and click on the option Date and Time.
- In the dialog box that opens, you will have multiple options available. date and time formats. Choose the one that best suits your needs.
- If you want this data to be updated automatically, check the “Update automatically” box. If you don't check it, it will be inserted as fixed text.
- Balance Accept to insert the field into the document.
Done! If you have activated the automatic option, the Date and Time They will be modified automatically when you reopen the document.
Customizing the date and time format
Word allows a wide variety of date and time formats to adapt to each user's different styles and local regulations. You can select different options such as:
- Day, month, year only (e.g., 06/06/2024 or June 6, 2024)
- Date and time (for example, 06/06/2024 10:25 am)
- Time in 24 or 12 hour format
- Day of the week next to the date
To change the format, simply repeat the above process and select your preferred format in the dialog box. Date and Time. You can even specify the language to adjust the format to the regional settings that best suit you.
Edit or update automatic date fields
If at any time you need to modify the date or time field that was automatically inserted, do the following:
- Click on the text of the when and where; you will see that it appears with a light gray background when you hover over it. This indicates that it is a dynamic field.
- You can double-click and edit the data manually. However, The next time the document is opened or refreshed, the field will display the current date again.
- To force a manual update of the date/time, select the field and right click, choose the option Update field.
This way, you will always have control over temporal information of your documents.
What happens if you change the date manually?
One aspect that raises many questions is what happens if you manually change the date in a dynamic field and then save the document. When you open it again, Word will display the current date again, overwriting any manual changes. Therefore, if you have inserted the date as an automatic field, remember that it will always reflect the system date from the team from which it is opened.
Insert date and time into tables or text boxes
Not only can you insert dynamic dates in the body of your document, but you can also do so in tables, headers, footers, or text boxes. The procedure is identical: place the cursor in the exact location, access Insert — Date and Time and select the format and the automatic update option.
Differences between Word and Publisher versions
In some Microsoft applications such as Publisher (part of the Office suite), the process is similar. The tab Insert It also contains the function Date and Time, and you can choose between inserting automatic or static data. Publisher allows you to select the language and format before inserting, and the field will automatically update every time you open or print the file if you check the corresponding box.
Advanced Tricks and Additional Fields
Word doesn't just offer the basic date field. There are other fields you can use for different situations:
- { DATE }: Inserts the current date and updates with each print or when you force fields to update.
- {TIME}: Insert the current time.
- { CREATEDATE }: Displays the date the document was created. Useful for templates.
- {SAVEDATE}: Indicates the last time the file was saved.
To insert these fields, you can press Ctrl + F9 to open the field brackets and type the name in capital letters (for example, {DATE}). Then right-click and choose "Update Field." This way, you can further customize your date and time automation.
Applying custom formatting to fields
Sometimes the default formats may not fit what you need. Word allows you to add formatting codes to fields to display, for example, “June 6, 2024” instead of “06/06/2024.” This is done by adding modifiers to the field, such as:
- { DATE \@ «dd MMMM yyyy» } to display the day, the full month and the year.
These codes are detailed in Word's help and allow for extensive customization.
Display the date and time in form controls
In forms created with tools such as Microsoft Office InfoPath or advanced Word forms, you can define special display formats for date and time fields. It's possible to display only the date, only the time, or both in different fields within the form. Additionally, you can change the regional settings to adapt the style, which is very useful when forms are used by people in different countries.
- Double-click the control (date picker, text box, or expression) on the form.
- Access to Control Properties and look for the option to select the data type (date, time, or both).
- Check the desired format option and accept to apply changes.
In some cases, especially in web form templates, you may need to place the date and time in separate controls if both data types cannot be displayed in the same field.

Passionate writer about the world of bytes and technology in general. I love sharing my knowledge through writing, and that's what I'll do on this blog, show you all the most interesting things about gadgets, software, hardware, tech trends, and more. My goal is to help you navigate the digital world in a simple and entertaining way.